Thursday, November 29, 2012

Front End Modification

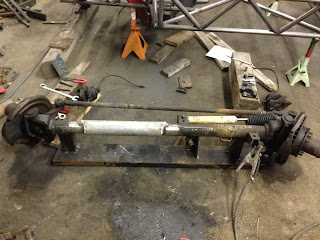
Here is the Chevy 10 bolt front end I got, as shown in an earlier post. It needed some modifications done to it to accommodate the four link suspension and to lighten it up as the offroad buggy I am making is only going to be 2 wheel drive so the heavy 10 bolt differential won't be needed.  


The first thing I did was weld the front end to a jig made from some heavy steel tubing and angle iron and then cut out the differential. I made the jig first and welded it to the front end so when the differential fell away and the axle was in 2 pieces the alignment would not get messed up.


Then I took some thick steel tubing with a 3 inch inner diameter and placed it were the differential used to be and welded it to both sides of the axle.


After getting the front end back in one piece I made 8 brackets that will hold the four link suspension, 4 go on the front end and 4 on the frame. The brackets have 3/4 inch holes which will fit the four link rod ends I ordered from QS Components. (link on right side of page)


To mount the brackets I cut some thick rectangular steel tubing and 45 degree supports and welded them onto the axle in the locations specified by the SolidWorks model I made up for the front 4 link suspension. Then I welded the brackets I made onto the steel tubing at 30 degree angles.



Tuesday, November 6, 2012

New Suspension Parts

I have finally found the perfect shock, the Fox Racing 2.0 Non-Coilover Air Shock with 12 inches of travel. This "Air Shock" doesn't require a coilover spring but instead utilizes high pressure nitrogen that fills the shock and acts as a shock absorber. This type of shock is cheap, lightwieght, condensed, and tunable. A new shock from offroadwarehouse.com (link on the right) is just $211 for a total of around $850, a much lower cost than any new coilover shock you wil find. Also without the heavy coilover spring the Fox Air Shock provides a very lightwieght option that also takes up much less space as a normal coilover. Another benifit to these shocks is that they are very easy to tune, all you have to do is change the pressure of nitrogen inside the shock.


I also ordered some limit straps and bump stops for the suspension to protect the shock from being pulled apart when the buggy gets air and the rear and front end drop or getting smashed when the suspension bottoms out. The limit straps are Synergy Suspension and are very high quality, I definitely recommend them for only $25 each and can be ordered in just about any length you specify. The bump stops are from Daystar and just simple cone shaped ones with bolts integrated into them. They are very cheap, just $10 for a pair and perfectly functional. Both of these other parts I ordered from Poly Performance (link on right)

Monday, November 5, 2012

New Front End

I just purchased a new front end (well new to me) off of Portland Craigslist for a whopping $50. It came out of an old Chevy Blazer and is a 1/2 ton, 10 bolt. It's has disc brakes and a steering rod and damper that came with it. Yes, it is a little bit rusty but with some resurfacing to the rotors and some new calipers it should turn out to be a good, functional front end. Also since I am not going to make this buggy four wheel drive I am thinking of cutting out the differential and just weld a tube across where it used to be to allow for more clearance between the frame and axle and also to just lighten the front end.


What do you think about cutting out the differential, will it work? Leave a comment.

Shortened Frame

I recently cut down the front of the frame from 55 inches all the way down to 33 inches. The new modification still provides enough room for the engine to fit while being able to accomidate a wheelbase that will end up being 22 inches shorter than the original frame. A shorter wheelbase will help me reach my performance goals by giving the tube buggy better handling and just being lighter, shorter, and overall easier to maneuver. I also welded a solid plate on the front to provide mounting points for the four link suspension that I will be fabricating soon.


Rear Four Link Suspension Complete

I have finally completed the rear four link suspension. Before I started building it I designed what the dimensions of it were going to be in the SolidWorks program. I designed a system that would be relatively easy to build and yet provide me with enough movement for the 12 inches of travel I am going to have. Here is a picture of what the design I made up...

(Picture coming soon)

Next, I built up the brackets that the trailing arms were going to attach to using steel tabs I purchased from Poly Performance (link on the right) to speed up fabrication.


I then welded thick, strong steel bars on the back of the frame to provide mounting points for the brackets and also made mounting points on the chevy rear end to put the brackets on.


I then made the trailing arms out of 1 1/4 inch by .120 round tubing following the dimensions of the SolidWorks model and welded in the bungs from the four link rod end kit I bought from QS Components (link on the right) putting one left hand and one right hand bung onto either side to make for easy length adjustment.


Finally I screwed in the four link rod ends to the trailing arm and bolted the four into the brackets on the frame and rear end. Here's how it turned out.