Sunday, October 20, 2013

It Works!

After finishing up many, many small tasks that needed to be done on the rig, I finally got a chance to test it out. The testing was mostly just on smooth road and I did not take the car to it's limits as the frame is still not fully welded and there are still multiple things that need to be finalized before full on testing but so far it has seem to function very well. I had it up to around 55 mph on the road and it handled well, no shaking and it tracked well. 

The buggy has plenty of power and can easily spin it's tires so some weight may need to be added to the rear or find a way to transfer some of the current weight to the back and the steering worked without any troubles. 

As of now the suspension needs some tuning, it is very stiff so I will need to do some work on getting the right nitrogen pressure levels and oil amounts to achieve the right spring rate. 

There is still quite a bit of work that needs to be done to completely finish this project but it was a very good feeling to get it running and driving properly, here is a short clip of the first ever test drive.


I am now off at college attending Cal Poly so this project is forced to be put on hold for a while but is to be continued. 

Thank you all for supporting and following this project. 

Sunday, June 30, 2013

Exhaust System Completed

After getting a 2.25" exhaust kit, which came with a couple 45, 90 and 180 degree bends along with a coupe pieces of exhaust tubing, and two straight-through glass pack mufflers from Jegs it was time to get working fabricating the exhaust system.


I planned out where I was going to route the exhaust, putting the mufflers at the front where the highest pressure would be to take full advantage of their sound deadening and adding in a x-pipe to equalize the sounds from both sides of the engine and add some more muffling. To make the x-pipe, I took two 90 degree bends and cut the outside of the bend off so each side was at a 45 degree angle to the bend and then welded both pieces together as seen below. 


I cut each piece to the length I needed it and then started laying it out, mocking it up underneath the vehicle, starting at the front working my way back, tacking each piece together as I went. Then after it was all tacked up under the buggy I welded some mounts for exhaust hangers onto both the frame and exhaust pipes and pulled it out from under the frame and welded it all up solid. Here's what it looks like all together.


The dual outlets are on either side of the rig, right at the back of the frame. I got theses slip-on 3" chrome plated exhaust tips to give it a little cleaner and fancier look at it comes out from under the frame.


A video on it in action will be up soon!

Saturday, June 29, 2013

It's Christmas in the Summer!

After being caught up with other parts of my life such as graduation and full days of work I decided it was time to get some work knocked out on this project so I got online and ordered a bunch of parts that I needed to get closer to a test drive. When they arrive all at once it was like having Christmas all over again getting to unwrap six big boxes of parts. Here's what I got...


  1. B&M Pro Ratchet Shifter
  2. Jeg's 2.25 inch exhaust kit
  3. Two Jegs straight-through glass pack mufflers
  4. Two 3 inch chrome plated exhaust tips
  5. Airaid cone air filter
  6. An assortment of 2 inch silicon hose bends to make radiator plumbing
  7. Nitrogen filling kit
  8. Two Trail Gear spiked tubing plugs


More information about each part and its installation yet to come! Pictures will be up soon to.

Tuesday, May 21, 2013

Full Hydraulic Steering Completed!

The full hydraulic steering system utilizing an 8 inch PSC hydraulic ram, a PSC orbital steering valve, custom fit hoses and a heavy duty truck power steering pump is finally finished.

When I first tested it I realized the stock reservior was much to small but I did not want to spend upwards of $200 on a new high capacity tank so I decided to make one. I found an old dented up stainless steel 1 Liter bottle, brushed all the stickers and paint off of it, cut a hole in the bottom and JB Welded a hose fitting on the bottom of it. I also drilled a small hole in the top to act as vent and as of now it seems to be working just as good as a $200 one.


This setup allows you to turn the tires from lock to lock with one finger evenwhen the vehicle is stationary. Here's a video of it in action... It's not the best video of it as I was trying to both video and run the wheel at the same time but I'll try and get a better one up soon.

 
The next projects I've got to finish up are custom making a driveline as well as hooking up the brakes. Here's a picture of the whole buggy just to give you an update of what it is looking like all together. (To enlarge the image, or any image, just click on it)


Thursday, May 16, 2013

Dashboard Complete

Today I completed cutting out the dashboard panel and installing the gauges, switches and lights. I cut the dash panel out of a sheet of aluminum, cutting a slot for the steering column and drilling holes for the tachometer, oil pressure and water temperature gauges along with the 4 switches and indicator lights and the start button. Then I bent the flat panel along the line were the mounting bars changed angles.


After completing the panel I installed the 3 gauges, four switches and indicator lights, and the start button. Then I took it to the buggy and fit in place making sure it all lined up with the mounting bars. I still need to drill and screw it in place but it fits up nicely.


Build Update: Steering, Interior Frame Supports and new parts

It's been a while quite some time since my last post as I haven't had a ton of time on my hands recently to work on this project. I've been on a time crunch to get my senior project done, a portable wood-fired pizza oven, along with working to get everything in line to graduate next month. I have made some progress on this off-road machine though.

For starters, I've got the full hydraulic steering pretty much all worked out. I modified an old truck's power steering pump to fit on the Chevy 350 I put in the rock crawler. Then I scavenged up some high-pressure power steering hoses a mechanic friend had lying around and cut them to length and crimped some new hose ends on them. After hooking up all the hoses I primed the system and tested it out. It seemed to work pretty well but I could not fully test it as the stock reservoir I currently have on the system is not large enough and would overflow if the the wheels were turned from lock to lock. Once I make a new larger reservoir I should be able to give the finished system a full test.


(Test Video Coming Soon)

I also finished up making the interior frame supports where I will mount the shifter and the dashboard panel. These frame supports are placed between the two seats and will also serve as a solid mounting point to make driveline guards off of.


Along with finishing up the interior frame supports and getting the steering the majority of the way done, I also ordered some new parts. A Wilwood brake pedal with dual master cylinders, a G-Force pro-series 5-point racing harness with quick release and high-density foam roll cage padding were all ordered from Poly Performance and are to be installed soon. 


Tuesday, March 5, 2013

New logo?

Recently, I have been thinking a lot about what kind of image or logo I want to put on the side of my offroad buggy and start to be know by. I started sketching up some different things and thinking of what I could use for images or words. After many hours of throwing away scratch paper I had doodled on trying to get some good ideas flowing, here is what I came up with.


I'm not 100% sure yet that this will be my final design but for now it's what I'm thinking. Any thoughts? modifications? comments?


Monday, March 4, 2013

Starting on the Steering

This evening I started working on the steering, mounting up the orbital valve and steering ram and cleaning up the steering pump getting it ready to install. To mount the PSC orbital valve, steering column and steering wheel I figured out the most comfortable position to have the steering wheel in by sitting down in the seat and positioning it over and over again until I found a spot that I was pleased with. Then I just made a simple mount off of the frame crossmember and welded the orbital valve's mounting braket onto that. I also made up the frame for the dashboard that is going to have an aluminum plate mounted to it holding all of the gauges, buttons, and switches.


For the hydraulic steering ram, I turned the steering assembly all the way to the left as that is the positoin it will be in when the cylinder is fully retracted and then made some simple steel brackets with 3/4 inch holes to bolt it to the rod ends on the cylinder. One of the brakets was welded to the axle and the other to the connecting rod.


My next step with the steering is to find a spot to mount the steering pump that will not interfere with the frame or anything else and then do all the plumbing for it, bleed the system, and test it out.
There is a link to a great forum post on how to set up a hydraulic steering system on the right side of the page, it has helped me a lot in understanding how everything goes together and I would highly recommend it for anyone who is doing this kind of steering.

Changin' out the Powerplant

Today, I installed the torque converter into the TH350 transmission and then bolted it all up to the new Chevy 350, there's a good link on how to install a torque converter on the right side of the page. After I had this assembly together I pulled out the old engine and tranny and dropped this one in.


For mounts I used the same front mount that holds the engine up but since the transmission went from being a big manual truck transmission to an automatic TH350 I had to cut out the old transmission mount and make a new one further back. The new engine and tranny assembly fit very well in the frame area. I now am working on getting everything hooked back up like the carburetor and all the hoses and whatnot that I had to take off to drop it in the frame.


On a different note, after a long search I have finally found some wheels for the front. They are aluminum, Chevy 6 lug, 15 inch wheels that a friend had lying around and gave to me free of charge which is a great help as I am already quite a bit over budget. For tires I picked up some used 35 inch offroad tires off of Craigslist. The tires came with wheels but they were the wrong lug pattern so I am just going to turn around and sell the wheels to hopefully offset the cost of the tires, or at least the majority of it.


Tuesday, February 12, 2013

A Wonderful New Powerplant

For the third now, I have went on a search for a new (to me) engine. The last Chevy 350 I got out of the C-60 farm truck had some pretty bad compression, with cylinders as low as 70 psi, making it not a very strong runner. It had problems starting and idling and didn't get close to producing its full potential of power. So I went on a search for a better one, here's what I found. I went with another Chevy 350 that was said to have came out of a Monte Carlo. This engine didn't come with a carburetor or distributor but I knew it was going to be a good very strong runner as soon as I saw the compression results. Some of the cylinders had double the compression as the old engine had, with the cylinders ranging from 135 all the way up to 150 psi. Here's a picture of what I got.


The engine came with new rods, a high capacity racing oil pan, a new water pump, an Edelbrock Performer intake manifold, new valve covers, all new gaskets, a new alternator, a new fuel pump, new wires and plugs and a bunch of other new little parts along with the engine stand. I then scavenged the 600 cfm carburetor, ram horn exhaust manifolds, and Jegs high performance distributor off of the other engine and put it all on this one along with the parts that came with the engine and here is what I got.


After many hours hooking up gas lines, vacuum lines, battery cables, priming the oil pump, putting in final plugs and much carburetor tuning and distributor timing here is the outcome.


I still have a little more carburetor tuning and timing to work on to get it running a little smoother, but I am very happy with how it is turning out.

Just as a side note, here is a couple pictures of the oil pump primer I made for the new engine out of an old distributor. This saved me over $70 from buying a new oil pump primer online and works just as well. It is easy to make, I think this one took me less than 5 minutes and if you've got an old distributor lying around or can find an old junk one it's also free. A simple "how to make a homemade oil pump primer" video will be put up soon.


Monday, February 11, 2013

An Evening of Mounting

Today I worked on making mounts for the battery and the radiator. For the battery I just made a very simple rectangle out of angle iron the size of the bottom of the battery to keep it from sliding around. I will still need to make a clamp out of some all-thread to hold the battery down but getting it permanently in place is a good start to figure out what I need to fit around it, such as if there will still be enough leg room for the passenger.


The radiator mount was a little more complicated, finding a reasonable place for it was definitely a challenge. I first though I would put it between the top mounts of the rear shocks and the top mounts of the 4-link suspension but not only was that going to be a very tight fit, when the shocks compressed the driveline will come up and would have created a conflict with the radiator. The next place I though of was to mount it flat hanging from the ceiling but although it would have fit there with no problem I did not like having the sight of this big radiator and fans in the view of the driver. You could still see straight ahead but the drivers vision upward was then blocked. I also just didn't like the looks of placing it there, it seemed way out of place. So finally, because there was no room to mount it up front, I decided to mount it here...


This is still not an ideal place for it because the inlet and outlet are facing the back but to get the fans on the right side I had to put it there and there was simply no room anywhere else. The inlet issue won't be a big problem I'll just have to get some U-shaped tubing to get them going the right way again. Being mounted up there it will also get good air flow through it as there is very little in front of it.

Also, just as a side note on the steering I got a hydraulic steering ram that has an 8 inch stroke and two inch bore from Poly Performance. Like the majority of the rest of my steering parts I also opted to go with a Performance Steering Components (PSC) one because of there high quality reputation. This hydraulic steering ram and the orbital steering valve should both be getting mounted fairly soon. Now, I just hope that the stock steering pump will have enough pressure to operate the system as it should so I do not have to purchase a new high performance pump for another couple hundred dollars.


Wednesday, January 23, 2013

New Steering Parts

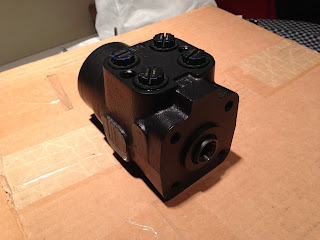
Work on this project has been going extremely slow lately with much of my time being taken up by my many other endeavors but I did manage to get some new steering parts along with beginning to install them. With help from a couple greatly appreciated donations I was able to order a PSC Orbital Steering valve, PSC 13 inch Steering Column and quick release, PSC Steering valve mounting bracket, and a Grant Formula 1 Steering wheel, the prices of these can all be seen on the budget page. The last part I will need to get to complete the steering is an 8 inch hydraulic ram along with all the hoses and fittings.

psc steer hydraulic steering hydro assist full hydraulic wheel steering wheel trail gear black offroad steering off road

psc steer quick release race buggy dune rig swamper hydraulic steering hydro assist full hydraulic wheel steering wheel trail gear black offroad steering off road

psc steer quick release race buggy dune rig swamper hydraulic steering hydro assist full hydraulic wheel steering wheel trail gear black offroad steering off road

psc steer quick release race buggy dune rig swamper hydraulic steering hydro assist full hydraulic wheel steering wheel trail gear black offroad steering off road

I decided to go with a PSC steering setup instead of competing brands such as Trail Gear because after scouring many of the offroad forums and reviews of each companies products I found an overwhelming majority saying PSC was much better and higher quality that any of its competitors. There was also many threads in forums on pirate4x4.com that revealed problems with the Trail Gear orbital steering valve leaking and also turning up to a quarter of a turn with absolutely no response to the wheel which and any amount of speed could lead to huge problems. Thus I concluded the PSC setup was well worth the few more dollars I had to spend.

I haven't had much time recently to work on actually mounting these new parts but I did get a chance to add in some more frame support members and a crosspiece that the "dashboard" will be made off of and the steering orbital valve will be mounted to.

psc steer quick release race buggy dune rig swamper hydraulic steering hydro assist full hydraulic wheel steering wheel trail gear black offroad steering off road rock crawler build frame fabrication process


I also picked up a new universal 19 by 25 inch radiator with two 12 inch cooling fans off of craigslist for $80, I know it doesn't really have anything to do with the "New Steering Parts" but I thought it was worth mentioning. This radiator will both fit on my rig and perform much better that an old bulky stock radiator out of the truck I pulled the engine from would.

psc steer quick radiator release race buggy dune rig swamper hydraulic steering hydro assist full hydraulic wheel steering wheel trail gear black offroad steering off road rock crawler build frame fabrication process